If you’re a business owner that has yet to put the power of Google Analytics to work for you, now’s the time to start. It offers a massive amount of invaluable data, empowers you to make more informed business moves, and is completely free – what’s not to love?
Well, for plenty of people, figuring out how to install and use Google Analytics is the hurdle standing between them and a smarter digital strategy. Although the tool was designed to be user-friendly, getting started can undoubtedly be intimidating… but that’s about to change.
Whether you’ve never heard of this online tool, haven’t gotten around to installing it on your website, or simply need to learn how to utilize it better, we’ve created a how-to guide that covers everything you need to know. From the V Digital Services team to you, here is our Absolute Beginner’s Guide to Google Analytics.
What is Google Analytics?
First and foremost, it’s essential to understand what Google Analytics is. Essentially, it’s a tool (or perhaps more accurately, a series of tools) that provides you with a straightforward method for gathering and analyzing data for your business.
Using the data collected and organized by Analytics, you can learn more about what’s working for your business online – and what’s not. One of the most significant benefits of this free online tool is its flexibility and the potential it has to be used in an array of different ways, including:
- Understanding the users that utilize both your website and/or app
- Improving your ability to monitor the performance of your content, products, and marketing efforts
- Tapping into Google’s insights and machine learning capabilities, which allows you to take your data to the next level of usability
- Pairing Analytics with other products from Google, making it easy to take a multi-faceted approach to strengthen your digital strategy
And because it is a tool created by Google, a well-known innovator of the tech industry, Analytics is continually adapting to better suit user needs and expectations. You can look forward to a tool that doesn’t remain stagnant but, instead, continues to grow and offer more opportunities at a steady pace.
Do I need Google Analytics?
Are you wondering if Google Analytics is essential for your business? Even if you have a small, brand-new business (in fact, especially if you do), Analytics is more than worth the time and effort. Bloggers, business owners, marketers, and countless other individuals will find Google Analytics an extremely useful tool.
With Google Analytics, you can get invaluable answers to these questions and many more:
- Do I need to create a mobile-friendly website?
- How many people visit my site every day?
- Where are my website visitors located?
- Which websites are driving traffic to my website?
- Which of the pages on my site are the most viewed?
- Which of my marketing tactics are the most effective in driving traffic?
- How many website visitors have successfully converted into customers or leads?
- What can I do to improve the speed of my website?
- What type of blog content do my website visitors prefer?
- Where do my converting visitors arrive on my website, and where do they exit?
This is just a very short list of the information you can gather using Google Analytics – but first, you have to install it on your site.
How to Install Google Analytics
Before installing Google Analytics on a website, you need to sign up for a Google account. If you already have a Google account that you use for Gmail, Google Calendar, YouTube, or Google Drive, you can use that one to set up Google Analytics. If you prefer, you can also open a brand-new Google account and go from there.
Something to keep in mind: you should use a Google account that you plan to maintain forever, and it should ideally be one that only you have access to. If you decide to add people/staff to the Google Analytics efforts, that can be done later. However, you don’t want to allow someone else full control over your Google Analytics tool.
This means that, above all, avoid having another person use their Google account to create your website’s Google Analytics account. Whether it’s your in-house web designer, a web host, an SEO person, or anyone else on your team, access to your Google Analytics data will go with them if they end up leaving your company.
Save yourself the time and frustration of starting from scratch by ensuring that you’re the primary owner of the Google account linked with Analytics.
Once you’ve signed up for an account, you’re ready to begin.
-
Set up your Google Analytics account and property.
First, make sure that you’ve signed into your Google account. Then, navigate to Google Analytics and click the sign-in button. The site will provide you with the three steps needed to set up Google Analytics:
-
- Sign up for Google Analytics
- Add your Google Analytics code to your webpages
- Access data within a few hours of initial set-up
There will also be a click-able “Sign Up” button. Click this, and complete the form with details about your website. If you want to use the tool to analyze an app instead, select that option at the top of the box.
As an Analytics user, you have the option to utilize hierarchies to organize your account better. Under a single Google account, you can maintain up to 100 Google Analytics accounts, with 50 website properties contained in each of those. One website property can have up to 25 views. Depending on your specific needs, there are several ways to configure hierarchies to fit your situation:
-
- If you have just one website, then only one Google Analytics account (and one website property) is necessary.
- If you have two websites (for example, one for personal use and one for business), you could opt to create two accounts to keep them separate.
- If you are the owner of several different businesses (but less than 50 total), with a website for each one, collecting them all within a Business-only account can help you stay on track. Then, any personal websites can be placed on your Personal account.
- If you have several businesses with many websites, and the total surpasses 50, a better option may be to organize each business under its own account.
Ultimately, there’s no one “right” way to set up and organize your Google Analytics account – it comes down to whatever structure functions best for your needs. If you find that your needs shift over time, it’s always possible to rename accounts or properties later on.
Keep in mind that you cannot move a specific property (website) from one Google Analytics account to another one. Instead, you would have to start the process all over under the new account, leaving past data behind.
Because this is a guide to beginners’ Google Analytics, let’s go with the assumption that you’re working with just one website for now. Typically, a new Google Analytics user would stick with the default “all data” view.
Once you’ve finished entering all of your business information, you will configure your data sharing settings. These settings put you in charge of what your data is utilized for, though regardless of what you select, collected data is always kept secure.
-
Install the tracking code on your website
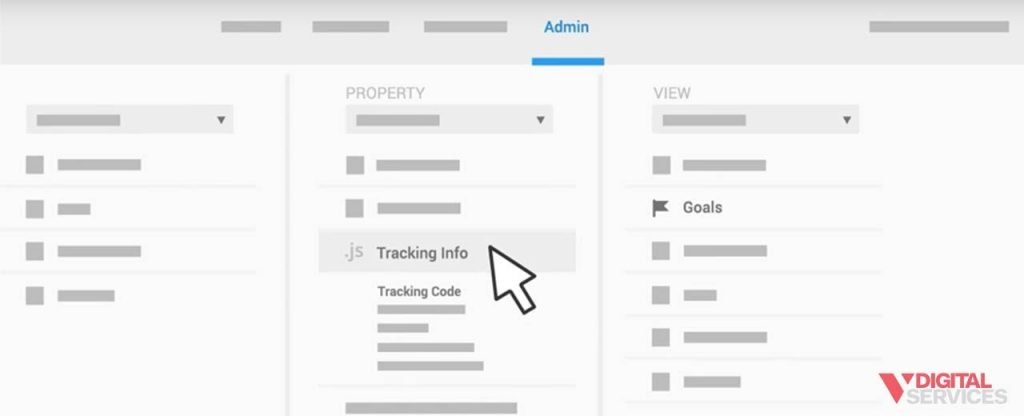
The next step is to click the button labeled “Get Tracking ID.” A popup box will display the terms and conditions for Google Analytics, which you are required to agree to if you want to move forward.
![]()
Then, the site will provide you with your customized code.
For Google Analytics to collect and analyze data from your site, the code must be installed on every page. The specific process for installing the Google Analytics code depends on what type of website you have.
For example:
-
- For a WordPress site on your own domain, the Google Analytics by Yoast plugin offers an easy way to install the code regardless of framework or theme.
- For a website built using HTML files, the tracking code should be placed directly before the </head> tag on each web page. Using NotePad (Windows), TextEdit (Mac), or a similar text editor, paste the tracking code into the appropriate spot. Then, upload the edited file to your web host with an FTP program such as FileZilla.
- For a Shopify e-commerce site, the tracking code will be pasted into the corresponding section within the Online Store settings (the box should be labeled “Google Analytics”).
- For a Tumblr blog, navigate to your blog page, then click “Edit Theme” in the top right corner of the page. Within the settings, you will paste just your Google Analytics Tracking ID number.
Installing Google Analytics is a relatively simple process, but it does vary considerably from platform to platform. Your selected plugins and website theme can also have an impact. But no matter what you’re working with, a quick Google search (“your platform” + “how to install Google Analytics”) can usually bring up step-by-step instructions.
-
Set up your goals
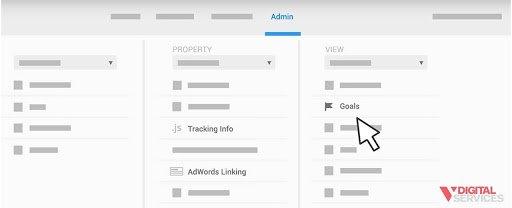
Once your tracking code is installed, there’s still work to be done. One of the most commonly-missed settings on Google Analytics is the Goals option, which you can find by clicking the “Admin” link (located near the top of Google Analytics), then “Goals” (under the “View” column).
The purpose of Goals is to notify Google Analytics when a vital action is completed on your website. For example, say that one of your website pages is a “Contact Us” page that contains a form to generate leads. Or, maybe you sell your products online. Whatever the key “action” is, users should land on a “thank you” or confirmation page once they’ve completed it. This seemingly simple page can serve as an important marker for Google Analytics Goals.
Here’s how:
-
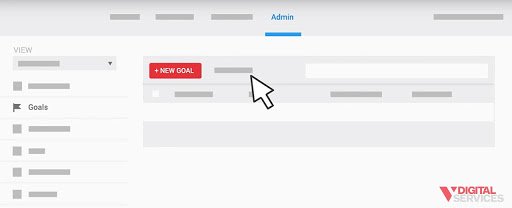
- Click on the “New Goal” button on the Goals page within Google Analytics.
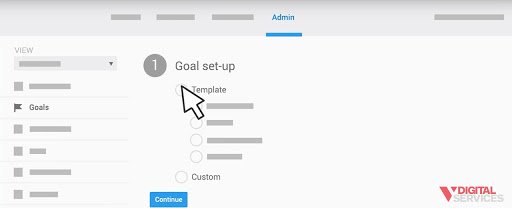
- Select the Custom option (unless another option makes more sense for your specific purpose), then click “Next Step.”
-
- Give the goal an easy-to-remember name. Select “Destination,” then click “Next Step.”
- In the Destination field, you will paste the URL of the “thank you” or confirmation page (only the portion that begins after the .com of your website name). For example, for a page URL that reads http://123business.com/thank-you, paste /thank-you in the Destination field.
- Adjust the Value as applicable, assigning a value if relevant to your goal.
- Finally, click “Create Goal” to finalize the set-up process.
You have the option to create up to 20 goals for your website, so take full advantage of this setting to track what’s most important to your business.
For most businesses, purchases, lead form submissions, and email list sign-ups are among the top goals.
Like all functions and tracking options in Google Analytics, there is extensive Support information on Goals available when and if you need it.
-
Set up Site Search
Site Search is another function that’s quick and simple to set up and provides extremely useful data in the future. If your website includes a search box, the Site Search function is for you. Here’s how to get it up and running:
-
- Use your website’s search box to conduct a search – it can be for anything. Leaving that tab open, navigate back to Google Analytics using a separate tab or window.
- Enter the Admin menu again, then click “View Settings” in the page’s “View” column. Switch “Site Settings” to ON.
- Go back to the tab where you ran the website search. Looking at the URL, find the query parameter (it’s usually either “q” or “s”). Enter this into the field labeled “Query Parameter” in the Site Settings, then save.
With Site Search set up, Google Analytics can now track the searches made on your website. This is incredibly helpful in learning more about your site visitors, including what they’re looking for and on which pages.
-
Add any additional accounts or properties as needed
At this point, it’s a good time to add on any other Google Analytics accounts (whether they are new or already-existing). Within the Admin menu, the drop-down menu under the “Account” column offers the options to “Create New Account.”
If you need to add on properties, this is also available in the Admin menu. Click the drop-down menu in the “Property” column, then select “Create New Property.”
From there, you’ll repeat all of the steps we discussed above.
After all of your accounts and properties are added to Google Analytics, the next thing to do is wait. In about 24 hours, Google Analytics will be able to start collecting data – which means that you’ll be able to start viewing it.
-
Take a look at your Google Analytics data
After the work of setting everything up, you’ve reached the point of payoff. Once you’ve waited a day or so, you can begin delving into the data behind your website.
Here’s a quick rundown of how to access website data on Google Analytics:
-
- Log in to Google Analytics. You will immediately arrive at the Audience Overview report for your site (if you have multiple sites, you will be presented with the full list to choose from first).
- The Audience Overview is just one of more than 50 reports that you can access through Google Analytics, all of which you can explore by clicking “Reporting” at the top of the page.
The first time you view your reports, you might not know exactly what you’re looking at – and that’s ok! There’s often a learning curve to website analytics, but the best way to build your understanding is through old-fashioned experience. Feel free to click around and discover the wealth of data you now have at your fingertips.
-
Familiarize yourself with the standard report features
You’ll probably quickly notice that most Google Analytics reports have a similar set-up, which makes it much easier to learn your way around the data.
When you’re in a report, the drop-down arrow in the top right section of the page gives you quick access to various websites within all your Google Analytics accounts. There’s also the “Home” button at the top for one-click navigation.
In the report itself, the top right section features the option to adjust the data date range or compare data from one date range to another. By hovering over different parts of the report, you can view additional information relevant to that specific section.
For example, in the Audience Overview report, hovering over the graph’s line will give you the exact sessions on the day that corresponds with that point. You can also hover over the metrics beneath the graph to learn more about what each one means.
After scrolling past the section that displays the main metrics, you’ll see reports that correspond to even more specific data about your web visitors, such as their language, country, and browser. Virtually every part of this section can be clicked to unlock details within that report type.
As you explore the reports, keep an eye out for clickable links or question marks. You’ll see this throughout each report, with each offering the opportunity to click or hover to learn more about a given section. There’s almost no limit to the fascinating data you can discover simply by digging around your analytics!
-
Get an idea of the types of Google Analytics reports available to you
When you look at each report’s left sidebar, you’ll see a long list of clickable options. For many of these, there are even more layers within layers to dive into – again, taking a hands-on approach to learning will be your best bet.
Here’s a short and sweet explanation of what you can expect to find in each category of reports:
Audience:
All of these reports break down everything you could ever want to know about your website visitors, from their age and gender to their geographical location. Here, you’ll be able to get an excellent grip on the who, what, where, when, and how of your audience.
Acquisition:
Wondering how a visitor found your website? In the Acquisition reports, you can examine traffic by category type or even specific sources. These reports are particularly useful in pinpointing traffic from social networks or connecting to AdWords and other tools to gain additional data.
Behavior:
The Behavior reports tell the story of your content, including which content is most successful (and which aren’t successful at all). You can see the most popular pages on your website, as well as the ones that most visitors chose to end their browsing. Site Speed is viewable among these reports, and Google will also offer you suggestions for improvements if needed. It’s also here that Site Search will come in handy.
Conversions:
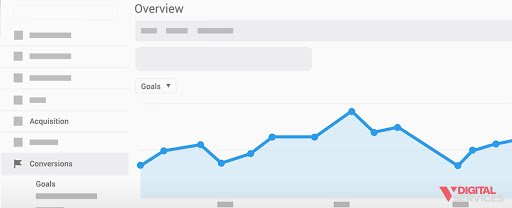
When we discussed setting up Goals a few steps back, it was in preparation for making good use of your Conversions reports. These reports tell you all about your website’s conversions, including how many there were, where they happened, and the paths visitors followed to get there. Look for the drop-down at the top of this section to toggle between multiple goals, or view them all at once if you prefer.
-
Take advantage of shortcuts and emails
You might not utilize every single report in Google Analytics, but there will be a handful that you come back to frequently. Using the Shortcut link at the top of the report page, you can add quick links to specific reports in your left sidebar.
The “Email” function is also a good one to put into practice. Click this link, then fill out the required information to have reports regularly emailed to you (or your team members).
Both of these options make it easier to incorporate Google Analytics into your everyday business practices – and that’s an excellent habit that will support your success in the short and long term alike.
Take the Next Steps to Boost Your Digital Presence
Now that you’ve completed our handy Google Analytics tutorial, you’re ready to start using it to your advantage. But if you really want to kick your website traffic into high gear, it may be time to call in the professionals.
As a business owner, you can certainly take some simple steps to build and strengthen your digital marketing strategy. However, once you’ve reached a certain point, it’s often far more effective – and a better use of your time, money, and energy – to partner with a team of experts instead of trying to do it all yourself.
At V Digital Services, we have worked with businesses of all types and sizes to achieve their goals using the power of digital marketing. With a wealth of industry knowledge and various professional tools and resources at our disposal, we are well-equipped to give you the competitive edge you need to succeed.
Learn more about how to use Google Analytics in a way that makes sense for your goals by reaching out to the V Digital Services team today.
Featured Image: One Photo / Shutterstock

 Audience, behavioral tracking, Google Analytics, google analytics tutorial, how to use google analytics, Tracking, what is google analytics
 PREVIOUS